
Table of Contents
- Where to Take a Pulse
- When to Take a Brachial Pulse
- How to Find the Brachial Pulse
- Checking the Radial Pulse
- Calculating Heart Rate Using The Pulse
- Know How to Protect Yourself and Others
Whether you’re in the medical field or not, knowing where, when, and how to take a person’s pulse is an important skill.
While you may be familiar with a few of the common pulse points in the body, you may not be as familiar with how to find the brachial pulse in particular, or when you might need to.
The brachial pulse is especially important if you need to check an infant’s pulse, but it can be useful for checking an adult’s pulse as well.
The better you understand how the human body works, the better prepared you’ll be to save lives in an emergency.
Read on to learn more about where and how to find the brachial pulse, and when it might be useful to do so.
Where to Take a Pulse
The human body has a number of pulse points. These are places where major arteries run close to the surface of the skin, making it relatively easy to feel the “pulse” of the person’s heartbeat, which is measured in beats per minute.
While there are many of these pulse points located throughout the body, a few of the most common ones that are used for taking a person’s pulse are:
- Brachial: Located in the inner upper arm.
- Radial: Located in each wrist.
- Carotid: Located on the side of the neck.
Knowing where these pulse points are located — and being able to find them quickly when you need to — is important, especially if there’s an emergency and you need to determine if the person’s heart is beating.
Pulse Characteristics
Once the pulse is found, the next step is to determine its characteristics. Though there are multiple ways to assess vital signs, we’re focusing on pulse rhythm, rate, force, and equality.
To remember pulse characteristics, recall the acronym “RRFE” – referring to rhythm, rate, force, and equality.
Rhythm: A normal pulse rhythm is regular, meaning that the pulsation frequency felt follows an even tempo, or a constant beat.
Rate: A normal adult pulse rate is between 60 — 100 beats per minute. To determine pulse rate, count for thirty seconds and multiply by two to find the beats per minute.
Force: Pulse force, or strength, is calculated on a four-point scale, where 3+ indicates a full, bounding pulse, and 0 is considered absent or non-palpable.
Equality: Is the pulse force equal on both sides of the body? If the person is healthy, it should be. If not, an obstruction or other condition may be at play.
The Nine Pulse Points
By now, you’re familiar with the brachial, radial, and carotid pulse points. But did you know there are six other locations where the human pulse can be palpated?
Here’s the full list:
- Carotid: below the jaw angle, beside the trachea
- Radial: on the bottom of the wrist, near the base of the thumb
- Apical: at the apex of the heart
- Femoral: below the inguinal ligament, or the groin crease
- Popliteal: on the back of the knee
- Temporal: along the top of the cheekbone
- Brachial: on the inner side of the bicep muscle
- Posterior Tibial: on the inside of the ankle
- Dorsalis Pedis: at the top of the foot
Curious to see how these pulse points look laid out on the human body?
We created this shareable infographic for visual learners like you.

When to Take a Brachial Pulse
Usually, on an adult, you’ll want to take either the carotid or radial pulse. These tend to be the easiest to find, so there’s less chance of making a mistake. However, there are some situations when it is useful to find the brachial pulse instead.
When checking an infant’s pulse, for example, the brachial artery is much easier to find, because infant necks and joints are still so small. The brachial pulse point is also used when checking a person’s blood pressure, and occasionally for other medical procedures.
Even if it’s not used as commonly as some of the other pulse points, it’s still useful to know how to find the brachial pulse, so you’ll be prepared if the need arises.
In the next sections, we’ll outline how to take the brachial pulse in yourself, another adult, as well as children and infants. If you’d like to stay ahead of the curve, check out our “Taking the Brachial Pulse” infographic.
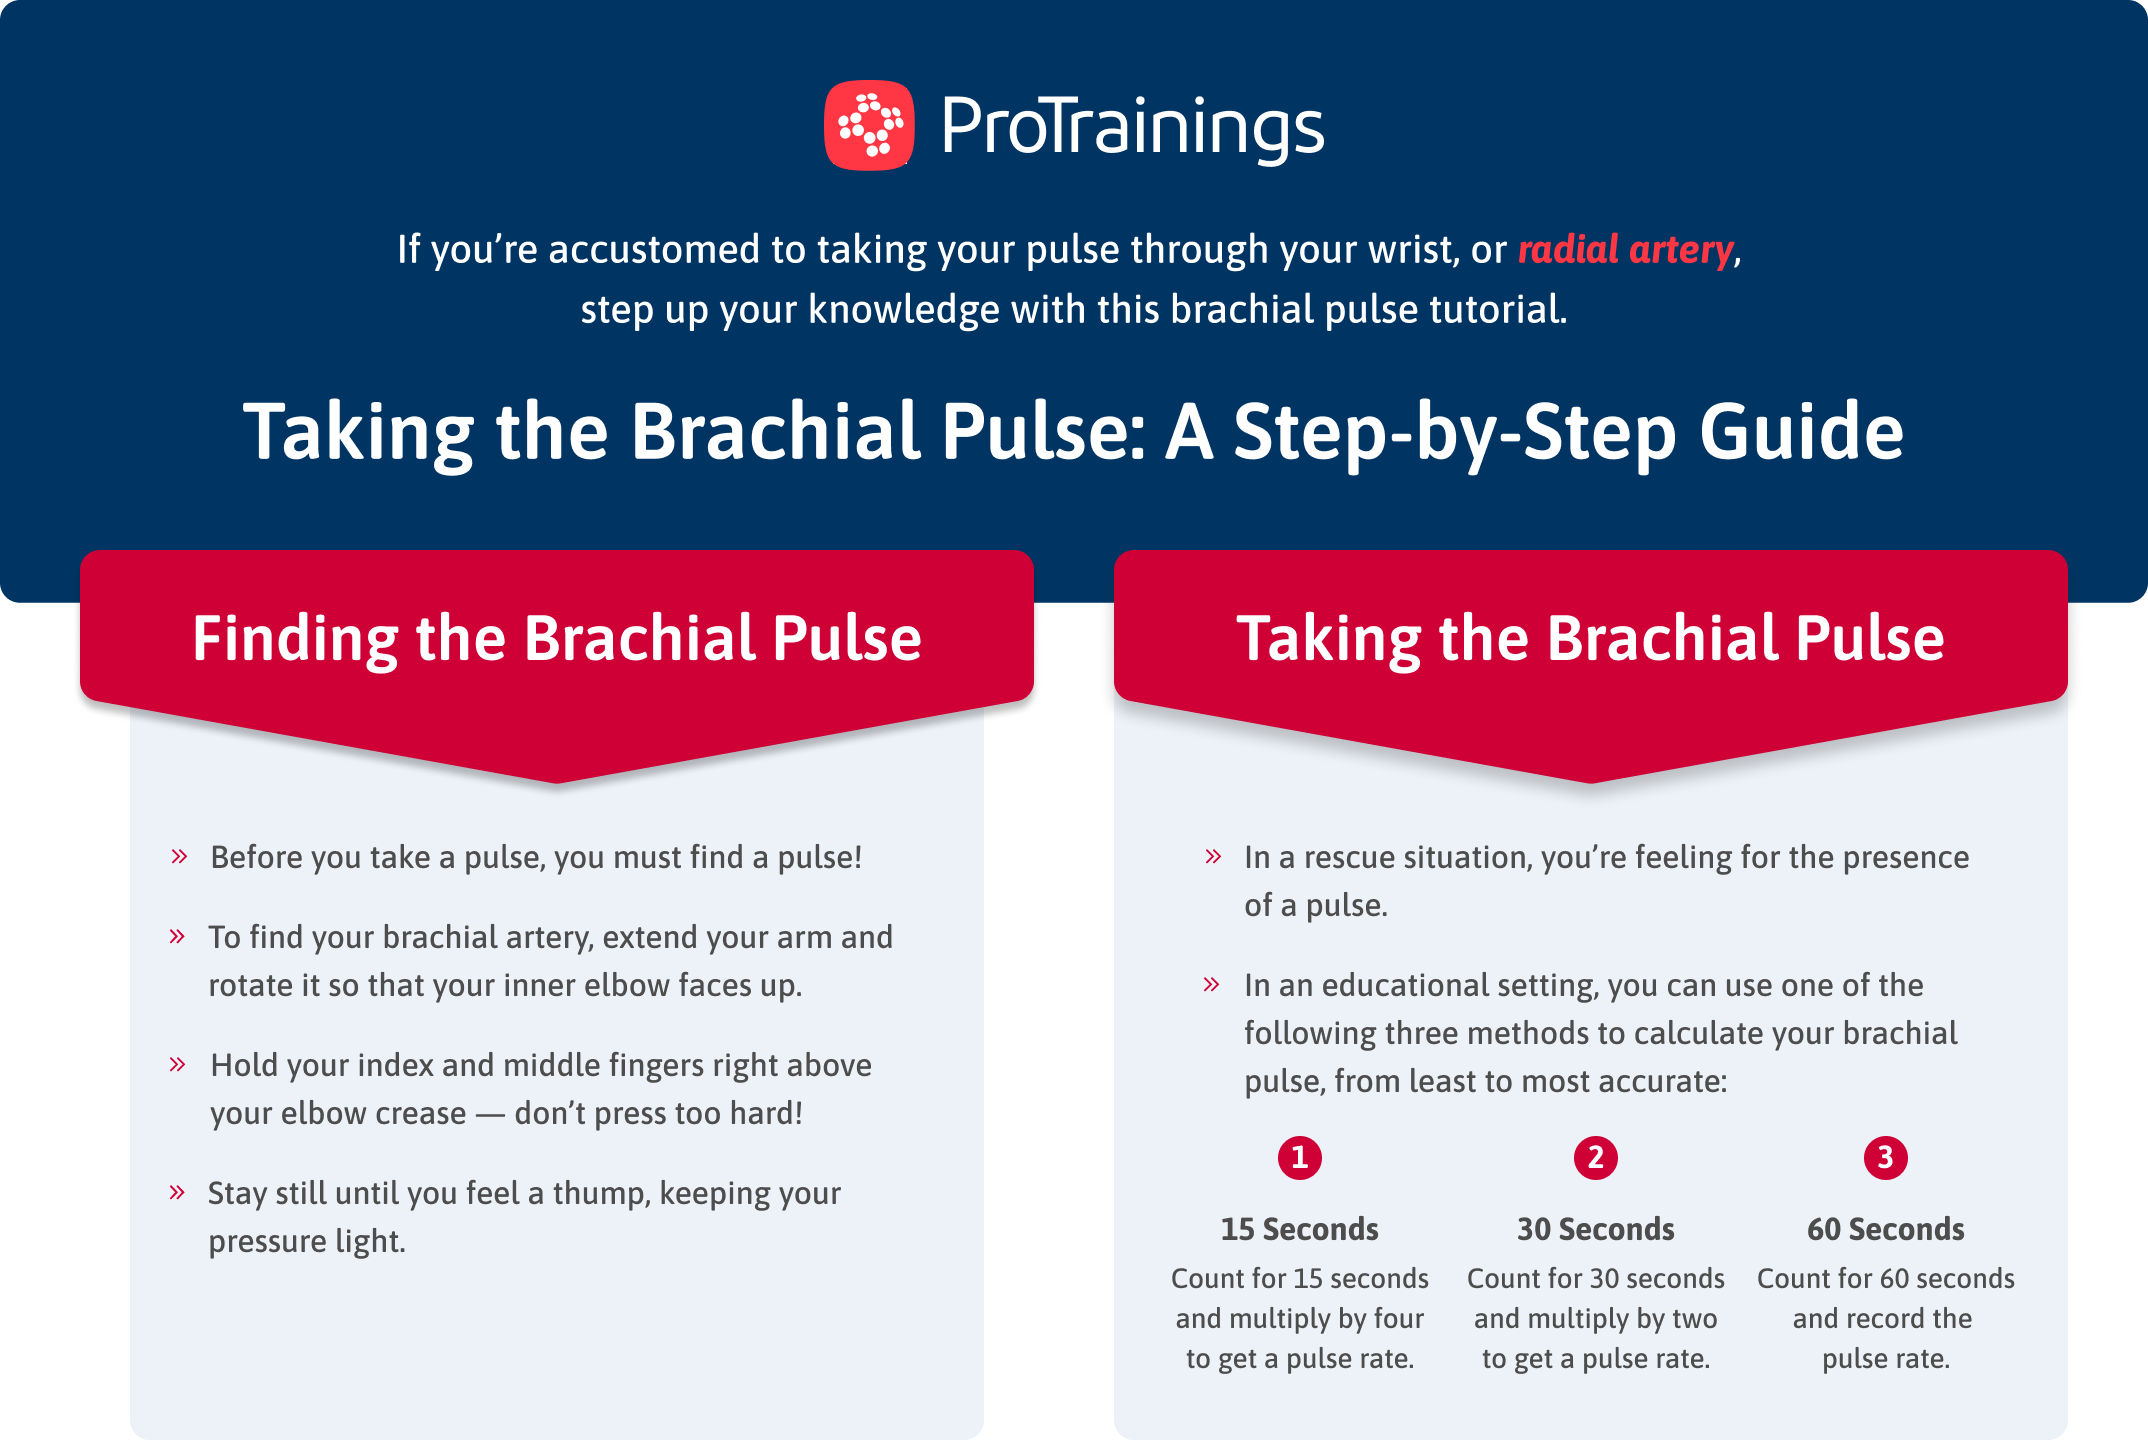
How to Find the Brachial Pulse
To find the brachial pulse, place two or three fingers on the inner side of the person’s upper arm, next to the bicep. Do not use your thumb, as it has its own pulse and can confuse your reading.
Finding the brachial pulse is similar in adults and children, but infants require a different approach.
Their bodies are smaller and softer, so getting a feel for their brachial pulse involves laying them down and palpating their inner arm.
Keep in mind that a “normal” pulse rate is different for everyone and varies according to a number of factors such as age, physical condition, medications, stress, and recent activity levels.
Knowing how to find the brachial pulse — or any other pulse point, for that matter — isn’t only useful when an emergency is actively occurring.
If you become familiar with your own typical heart rate now, you’ll be more likely to notice when your heart is beating differently than usual — which might just save your life someday.
Checking the Brachial Pulse in Adults
When you, a lay rescuer, need to check the brachial pulse of another adult, follow these steps for success:
- First, locate the brachial artery. Extend the arm and tilt it so that the inner elbow faces upward. Have the person relax their arm, maintaining a slight elbow bend.
- Place your index and middle fingers on the upper arm just above the elbow crease, or cubital fossa. You should feel a slight indent between the bicep and brachialis muscles.
- Hold your fingers still to feel for a beat, adjusting your fingers until you feel a thump. Keep your pressure gentle and light. No discomfort should be felt.
- Calculate the pulse by counting for 15 or 30 seconds, then multiplying by four or two.
Pro Tip: Often, you can see the brachial artery on the inner arm.
Checking the Brachial Pulse in Children
In a rescue situation, it is recommended to feel for the carotid or radial pulse in children instead of the brachial pulse. Therefore, you can follow these instructions:
- First, locate the carotid or femoral artery. The carotid arterty is on the side of the neck. The femoral artery on the inner thigh in the crease between the leg and groin.
- Use your index and middle fingers together to feel for a pulse at either location.
- Hold your index and middle fingers still to feel for a beat, adjusting your fingers until you feel a thump. Keep your pressure gentle and light. No discomfort should be felt.
- Calculate the pulse by counting for 15 or 30 seconds, then multiplying by four or two.
Checking the Brachial Pulse in Infants
Learn how to find the brachial pulse in infants by following these steps:
- First, locate the brachial artery. Lay the infant down on their back with their hand by their ear.
- Feel for the pulse on the inner arm between the shoulder and the elbow.
- Gently press your middle and index finger together on the spot until you feel a beat.
- When you feel the pulse, count the beats for 15 seconds.
- Multiply the number of beats you counted by four to get the beats per minute.
Usually, learning how to find the brachial pulse in infants is part of emergency medical care. Learn more about neonatal basic life support with this video.
Checking the Brachial Pulse for Blood Pressure
Did you know that the brachial artery is used to calculate blood pressure?
Here’s how medical professionals take blood pressure using the brachial artery:
- First, they place the blood pressure cuff around the brachial artery.
- Then, they find the radial pulse.
- They inflate the cuff until the radial pulse cannot be felt.
- They take the number on the cuff and add 30.
- They then inflate the cuff to the number indicated in the previous step.
- Lastly, they listen for the systolic and diastolic pressure.
Good to Know: “Systolic” is the whooshing sound heard through the stethoscope when the cuff deflates. “Diastolic” is when that noise stops.
For a visual version of what we’ve shared above, as well as a side-by-side comparison, download our comprehensive PDF.
Checking the Radial Pulse
The radial pulse can be taken in either wrist, as the radial artery resides in both wrists.
If an accurate pulse rate is what you’re after, take your pulse at the same time every day, sitting down and resting for several minutes beforehand.
- Place your arm out with your palm facing up. Focus on the area between your wrist bone and the tendon in the “meaty” part of your hand.
- Using the index and middle fingers of your other hand, to feel the pulse in your radial artery between your wrist bone and the tendon on the thumb side of your wrist.
- Apply just enough pressure so you can feel each beat without pushing too hard. You don’t want to obstruct blood flow.
- Set a timer for 60 seconds, or watch the second hand on a clock as you count how many times you feel your pulse.
- Record your pulse rate!
Calculating Heart Rate Using the Pulse
There are several ways you can calculate heart rate using the brachial, radial, femoral, or carotid pulse. The method you choose depends on how much time you have.
In a rescue situation, often, you’re feeling for the presence of a pulse, so 5 — 10 seconds is all that’s needed. However, if you’re trying to calculate the general pulse rate, use these amounts:
- 15 seconds: count for 15 seconds and multiply by four to get the pulse rate.
- 30 seconds: count for 30 seconds and multiply by two to get the pulse rate.
- 60 seconds: count for 60 seconds and record the pulse rate.
Know How to Protect Yourself & Others
Knowing how to find the brachial pulse can be an important and even lifesaving skill, especially if you’re dealing with an infant. Even if there isn’t an active emergency yet, the more you understand about how the human body works, the better prepared you’ll be to protect yourself and others from serious harm.
At ProTrainings, we believe that anyone can learn to save lives in an emergency. For more CPR and first aid tips and best practices, follow us on LinkedIn.